The Shopify Flow app lets you automate a ton of tasks to help manage your Shopify store. WOTIO is integrated with Flow to make sending account invitations easy! Just follow this simple set up guide below.
Requirements
Requirements
There are a few things you need to have before you can use Shopify Flow and WOTIO to send your account invites.
- The WOTIO app installed
- The correct WOTIO plan – The Shopify Flow integration is available as part of our Flow and Advanced plans.
- The Shopify Flow app installed
Download Our Free Shopify Flow Templates
Download Our Free Shopify Flow Templates
Visit our Shopify Flow template library and download the Flows for your store. You will be up and running with WOTIO in minutes!
If you still want to create your own Flow without using our templates, follow the instructions below.
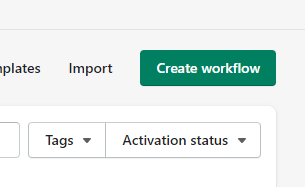
Step 1. Open the Flow app and select ‘Create Workflow’
Step 1. Open the Flow app and select ‘Create Workflow’
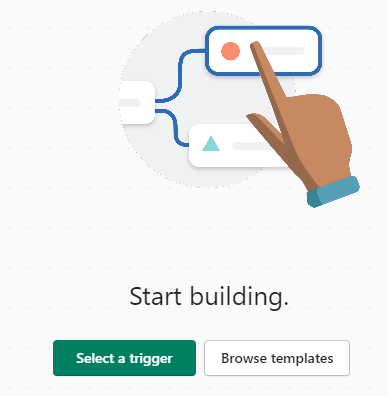
Step 2. Select ‘Select a Trigger’
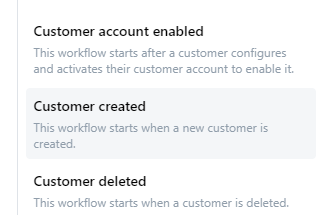
Step 3. Select the trigger ‘Customer Created’ on the right menu
Step 3. Select the trigger ‘Customer Created’ on the right menu
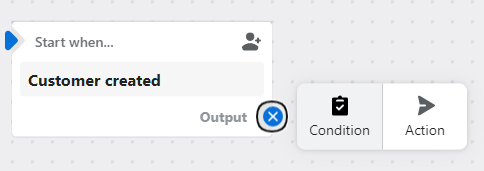
Step 4. Click the + icon on the Flow card to create an action (or condition) for this trigger
For the sake of this guide, we are going to show you how to set up the ‘Action’. See below for some quick info on how conditions work. This guide is not a comprehensive overview of how to use Shopify Flow. You can view an official guide here.
Optional: You can add conditions to your workflow so that invites only go to certain customers
If you add a condition, you can select from many customer attributes to determine the proper conditions to send the account invitations. For example, you might want to only send to customers who have placed an order at least once. First, select the ‘Customer’ conditions:

Scroll down to the ‘numberOfOrders’ condition and select that option. Fill in the details of how many orders your customer should have before WOTIO sends them the email.
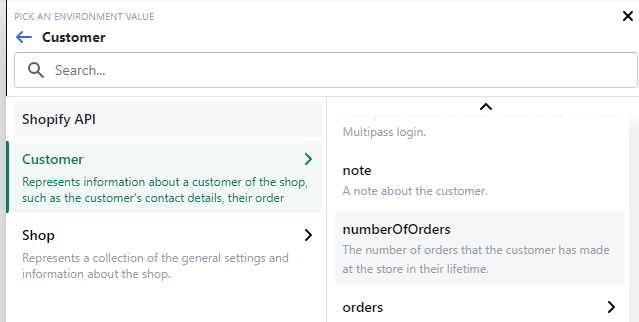
This is a really brief example of how you can set conditions using FLOW to determine who receives an account invitation. For support setting up your condition to work properly with WOTIO, please contact us and we’d be happy to help.
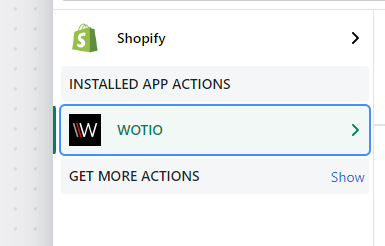
Step 5. Select the WOTIO app on the right under ‘Installed App Actions’
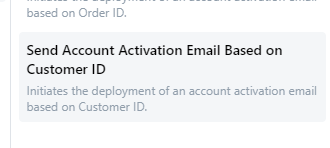
Step 6. Select the ‘Send Account activation email based on customer ID’ option
Step 7. Click the ‘Turn on Workflow’ button
![]()
Step 8. Confirm you want to turn on the workflow
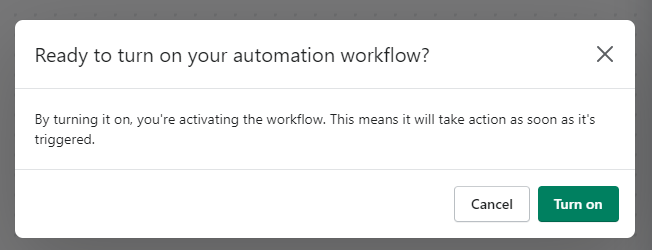
Congratulations! Your workflow is activated, and will begin sending account invites to customers as soon as they are created in your store.
That’s it! If you need any assistance, please don’t hesitate to reach out to WOTIO support.