FAQs
Select from an FAQ topic below to filter the available questions. Do you have a question now answered by our FAQs? Contact our support team for further assistance.
- All
- Automatic Invites
- Bulk Account Invites
- Email Editor
- General
- Self-serve Site Link
- WOTIO Account Invites Plus App
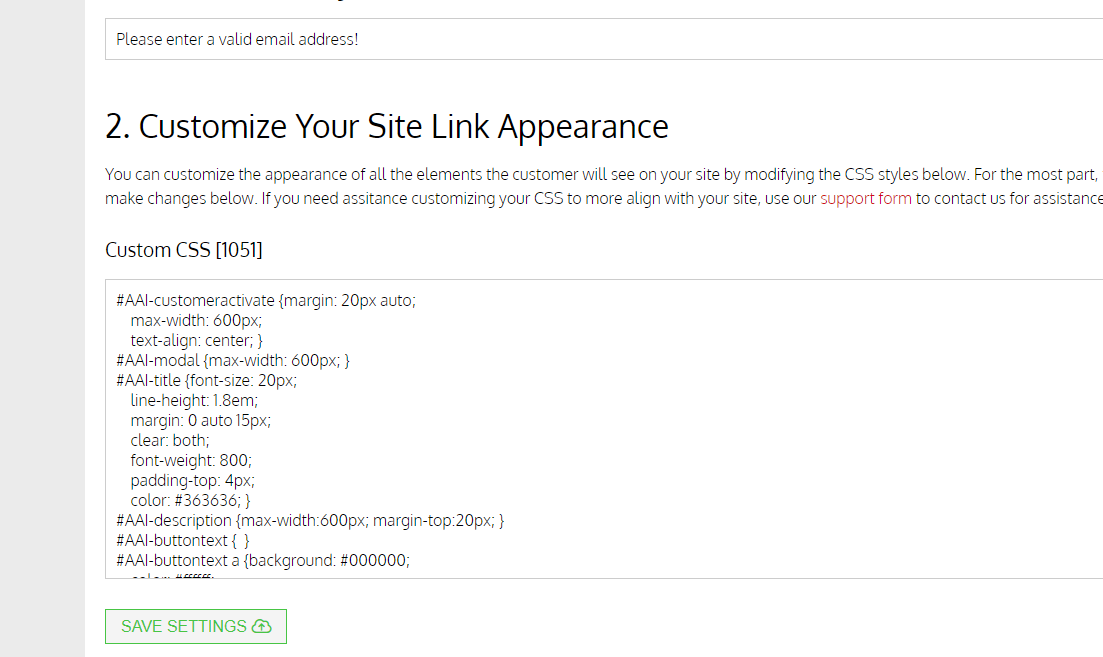
You can use the following sample CSS as a starting point in customizing your site link to fit your website.
Paste the CSS code above into the WOTIO app Site Link customization section near the bottom of the page.
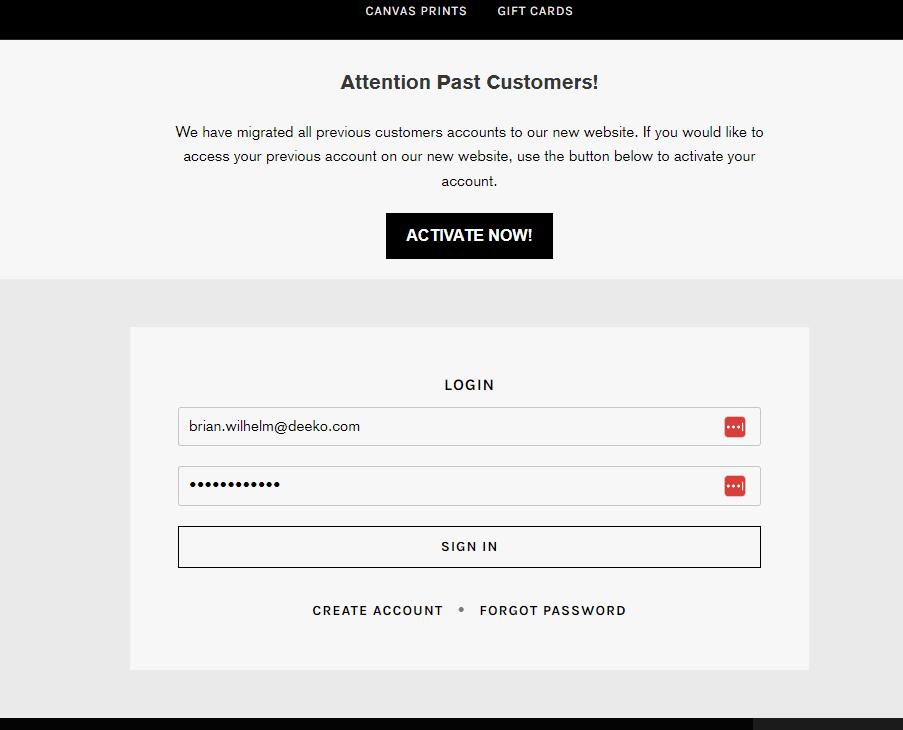
After saving your updates to the CSS, your site link will look something like the following on your website:
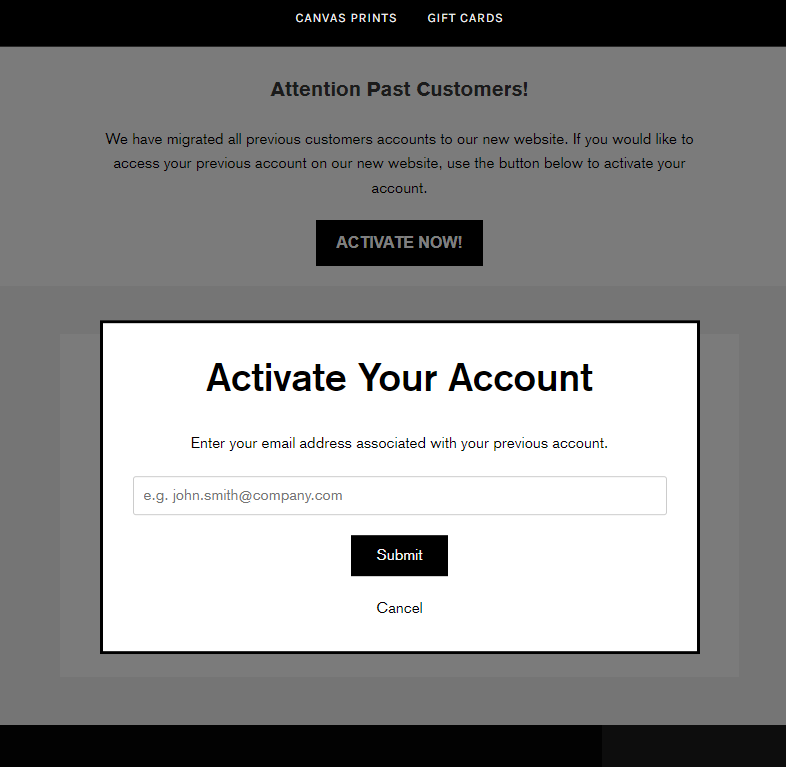
The modal window will look something like the following:
If you have any issues working with the CSS and need assistance with styling your site link to match your website, please reach out to WOTIO customer support. We’d be happy to assist you get your site link up and running.
The following instructions can help you install the site link using the theme editor built into the Shopify admin.
1. Navigate to your online selling channel, and click the ‘Customize’ button to open the theme editor.

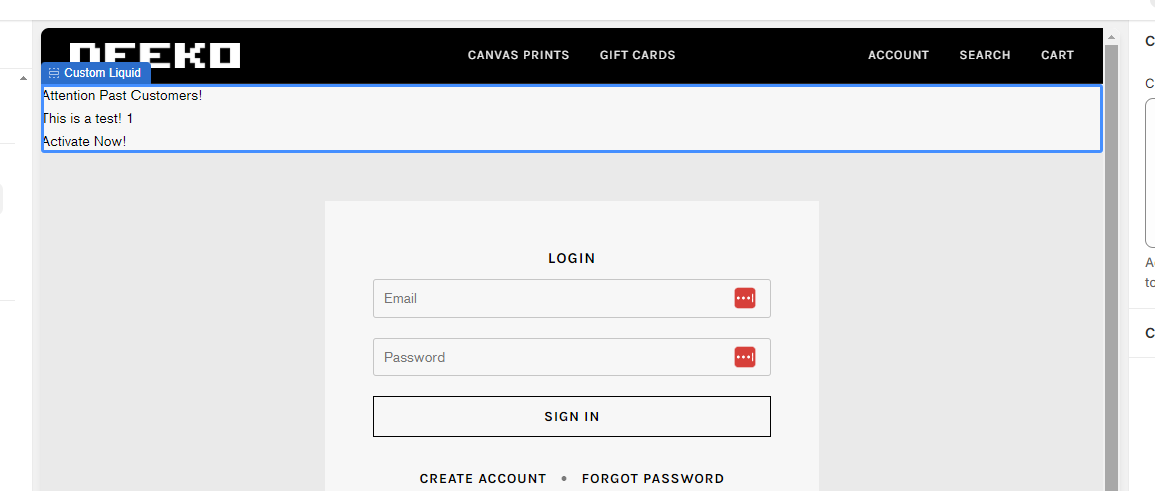
2. Navigate to your login page, or the page that you would like to add the site link code. Most merchants insert the site link code above the box on the login page.

3. Add a new section to your page, and select to add a ‘custom liquid’ element to that section.
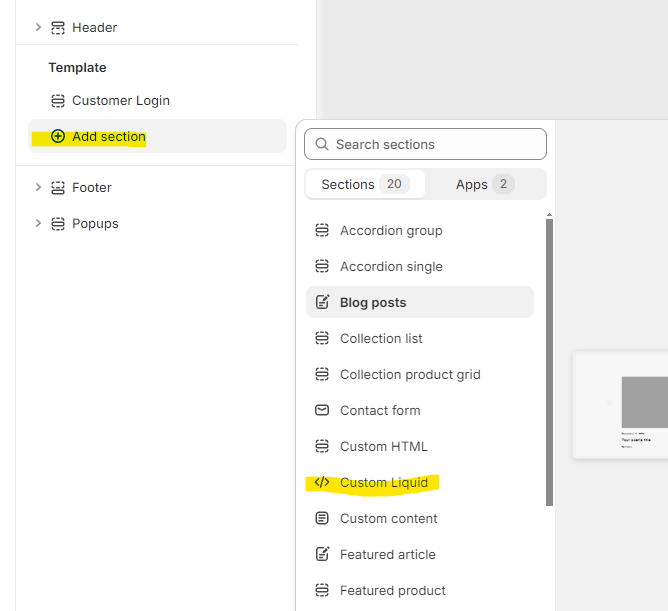
4. Paste the site link code provided by the WOTIO app into the custom liquid field, then click the save button in the top right corner.
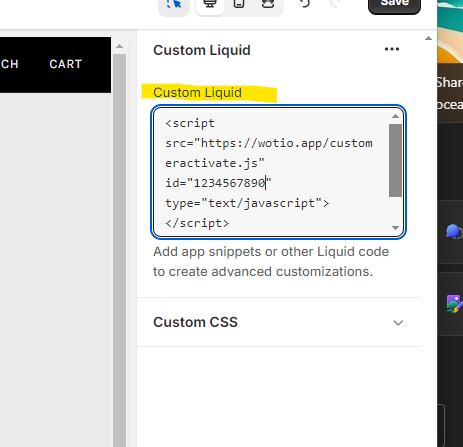
5. Once saved you should see the site link basic display on the page. You can now move into the WOTIO app and apply CSS to customize the display of the site link to fit your website.
Segmenting customers based on email service providers, especially focusing on larger, verified domains like gmail.com, yahoo.com, or outlook.com, can enhance the reliability of email delivery. Shopify tends to have better success rates sending emails to these larger providers, which can help ensure that your bulk invitations are delivered without interruptions.
Currently, there are no direct workarounds within Shopify or our app to support alias emails for the Site Link feature. We recommend using standard email formats without additional characters following a ‘+’ symbol to ensure compatibility and functionality.
If an alias email is used, the Site Link feature may not function properly. The account invite or activation link might not be generated, and the intended recipient may not receive the necessary email to activate their account.
Alias emails, which include a ‘+’ sign followed by additional characters, are not recognized by Shopify’s standard email processing system for account invitations. Since our Site Link feature integrates directly with Shopify, it adheres to the same limitations and cannot process these types of email addresses for account invites or activation.
While our app aims to be the best it can be in regards to initiating account invites for your customers, there are several factors that interrupt your deliveries that you should keep in mind.
1.Invalid email domains – Shopify will not deliver an account invitation to an email domain it has deemed invalid. Invalid domains can be anything from a typo in the domain name (gmaik.com instead of gmail.com for example), or a domain that does not exist. Too many invalid domains in an overall segment you are trying to send to will cause Shopify to reject sending for a period of time and halt delivery.
Recommendation: Make sure you are only sending to valid domains, and do not include email addresses in your segment that aren’t your customers or you haven’t verified through other tools.
Pro tip: In your segment definition, only include email addresses from the major email providers like gmail, yahoo, hotmail, and others to ensure Shopify sees these email domains as valid. Chances are a large majority of your customers are using one of these major providers for their email address.
customer_account_status = 'DISABLED' AND (customer_email_domain = 'gmail.com' OR customer_email_domain ='yahoo.com')
Here’s a link to HubSpot’s most popular free email address providers: https://blog.hubspot.com/marketing/free-email-accounts
2. Too many requests to the Shopify API – Shopify puts a limit on the number of API requests any one store can make in a given period of time. If you have applications attached to your store that are processing data through the API, and then you try and deploy bulk invites with WOTIO, chances are high that one or both of these processes that rely upon the Shopify API to function will stop due to exceeding the data request limits.
Recommendation: Disable other API-intensive processes when you deploy your bulk invites to ensure all the messages can get out to your customers.
If your bulk delivery ends prematurely, please take a look at your segments and processes running on your store to ensure these issues noted above are not interfering with your deployment. If you need additional help, please reach out to the WOTIO support team, and we will be glad to assist you.
Shopify Flow is an amazing rules-based engine provided for free to all Shopify merchants. With it, store owners can use a drag-and-drop interface to create the rules that govern how some tasks are performed for your store. It can help automate reporting, automatically tag customers, and so much more. WOTIO integrates with Shopify flow to allow you to create the rules by which you send out your invitations. You can use the Shopify Flow rules to get much more specific about who receives your invitations, and when.
For example, you can have one ‘flow’ look at your customer that just ordered from you, determine if they are a repeat customer or new customer, apply a tag to their customer record such as ‘New Customer’, then send them an account invitation. Once you turn on this automation, it runs automatically without any staff involvement. With Shopify Flow, you have many more options for controlling invites than you do within our current customization options in the WOTIO app.
Learn more about Shopify Flow here: https://apps.shopify.com/flow
See our guide on how to use WOTIO with Shopify Flow here: https://wotio.com/faqs/guide-use-shopify-flow-to-send-account-invites-with-wotio/
The WOTIO app should be fully compatible with Shopify 2.0. Our testing has confirmed this, however if you experience any issues, please reach out to our support team and we can address them right away.
To properly test the site link, you should use an email address that is not already associated with an active account. Here is how to determine this.
Checking Shopify Customer Record to Make Sure it is Eligible for an Invite
- Navigate to Customers, then search for your test customer record.
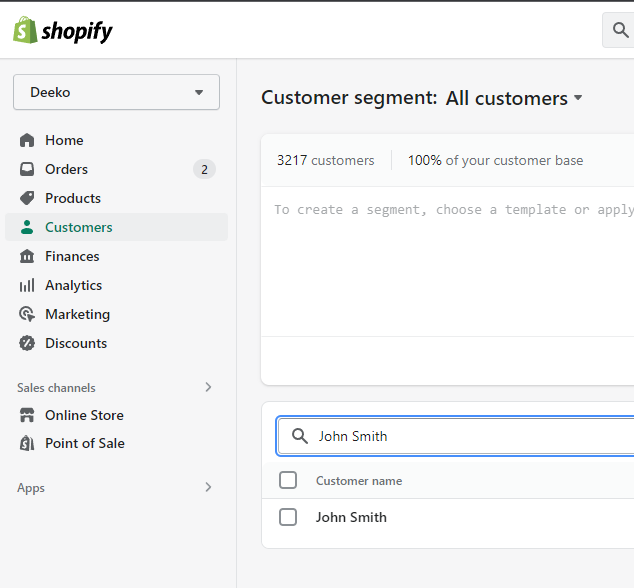
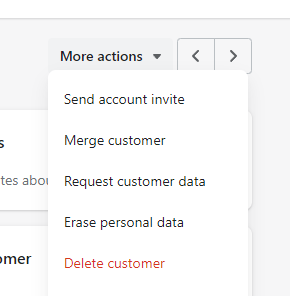
- Click on the record, then use the ‘More Action’ menu in the upper right to check the invite status. If you see either ‘Send Account Invite’ or ‘Resend Account Invite’, you should be able to use our site link to send an invite through to this customer record. Just make sure it’s your email address on the customer record before you send!
Below we have listed the permissions our Account Invites Plus app requires, and the reason why we need that permission.
Read and Write Customers – we need this permission to deploy the account invite to your customer. We do not store customer personal data on our servers or database. We only use the Shopify customer ID for the purpose of sending account invitations.
Store Locations – we use this permission to enable automatic invites sent to customers only from certain locations you specify in the app settings.
Orders – we need access to some order data for our simple pick list feature, as well as our Shopify FLOW integration. We do not keep any order data on our servers or database.
Marketing and Pricing – we need these permissions for our bulk code generator, which creates discount codes and inserts them into your store.
Content – this allows our landing page editor to add or update page content for your store.
Products & Inventory – we use these permissions to enable our simple pick list, and future features for back in stock messaging.
Locales / Languages – this permission enables our app to know and create content for your published languages on your site.
Customer IDs can be found by looking up one of your customers (preferably a test customer with your email address and an inactive account) and then referencing the ID found at the end of the URL for that customer.
- Go to your customer admin in Shopify
- Click on your test customer to view that customer’s details
- Look at the URL in your browser. That URL should look something like ‘https://mystore.myshopify.com/admin/customers/123456789890‘
- The number at the end of the URL (i.e. 123456789890) is the customer ID you can copy and use when testing dynamic emails with our email editor.
The invite link will NOT be the same for a customer when using each of these tools. The Bulk Invite tool and the Link Generator tools are not intended to be used simultaneously, however they can be used sequentially.
For example, you could use the Bulk Invite first to send out invites to your customers. Then, a week later, you might want to generate links for your customers and send out invites through your own email platform. This would work fine, however there is one caveat: the reason they can’t be used simultaneously is that when you generate the links for the second batch with the link generator tool, the activation links from the first email batch become invalid, as Shopify will generate NEW links for those customers when you use our link generator tool. So any customer that clicks the link on your first bulk invite will get an error message, so make sure you wait a sufficient amount of time between sending out batches of activation emails if you decide to start with our bulk invite tool and move to generating links for your own email platform.
Yes! Just contact us if you would like to try out the Advanced Plan features for 7 days.
Our 7-day free trial is restricted to established, currently operating or soon-to-launch stores on Shopify. We will review your website before granting trial access.
Here are the steps to take to apply for the 7-day free trial.
1. First, install the app! Visit the WOTIO app page and install the app here.
2. Once the app is installed, choose the free Starter Plan option.
3. Use the contact form here to send us an email to let us know you would like to access the free trial for the advanced plan.
We will review your site in 1-2 business days and contact you with information regarding the trial status.
The account invite is a Shopify platform email so it’s just like other Shopify transactional emails for your store. The Shopify platform deploys the account invite emails to your customer when you use our app. Because the email is actually deployed by Shopify, the ISPs see the emails coming from a Shopify server, which in general sends a lot of emails to lots of customers for lots of stores, which could trigger some spam filter mechanisms at certain ISP. The ISPs look for email origination, email content, valid ‘from’ addresses, and more to determine whether an email is SPAM or not.
To ensure your emails make it to your customer’s inbox, it’s important your follow Shopifys guidelines for setting up email with your store here, including SPF records and DKIM:
https://help.shopify.com/en/manual/intro-to-shopify/initial-setup/setup-your-email
The Shopify platform does the actual sending of invitation emails, whereas the WOTIO app simply initiates the sending request, therefore you must look at your email set up within the Shopify platform. Shopify has addressed the cause of bouncebacks by providing this article on how to resolve the issue of bouncebacks for your store:
Pricing for sending out bulk invites is based on individual deployments. A deployment can contain as many customers as you want in each deployment.
With our starter plan, for example, you can bulk invite as many customers as you want in a single deployment for $10. So if you decided to send to all customers who don’t have accounts in your store, that would be $10.
If you decided you wanted to segment your customers into 2 groups, for example, so that you can change the content of the invite to cater to each group, then that would result in 2 deployments (one to each group), and thus would be $20 ($10×2).
Shopify Customer ID – the single identifier Shopify uses to represent a customer. This will be the only customer ‘data’ stored in our app at this time.
We do not sell or reuse any data collected in the app. The data is collected as service to our subscribing merchants for their own use. As soon as our app is uninstalled, there is a process that removes all the data for that store from our app.
On the automatic account invite dashboard you’ll see a section labeled ‘Last Automatic Invites Sent’, which will show customer ID and the date the invite was sent out. You can also check your accounts for customers that have purchased or been added recently and take note of their account status, which should indicate ‘Account invite sent’.
No, you can use the default email that Shopify provides. However, we recommend taking some time to update the language used in the email to reflect your own brand voice, and include some reasons as to why a customer should activate their account.
This totally depends on how many customers you have shopping with your store, and how many of those checkout as guests. Also, if you connect your store with other platforms, such as eBay using the Inkfrog Open app, your customers from those platforms will come in from those apps as ‘disabled’ accounts. Those customers will also automatically flow into WOTIO invite system.
There are a few ways to approach this. If your customers are already imported to Shopify, then you can use the bulk invite tool to send an invite to your past customers. If your customers are not yet imported to Shopify (for example, you are in the process of migrating to Shopify from another platform), you should refer to our migration guide to help ensure the best experience for your customers.
If you need to change the timing for your invites, first click the ‘disable’ button on the dashboard. This will pause any invites that were scheduled to be sent for your store. Then, enter the appropriate timing into the text field. Once you are finished configuring the timing, click the enable button again to unpause your invites. Please note: Any invites for customers that were already in queue will not reflect the changes to timing you just made. Only those customers added to the queue after you made your change will reflect the timing adjustment.
Yes. If you choose to upgrade to the Advanced Plan, then you will have the option of setting the timing for the invitation to send ‘immediately’ (generally within a few minutes), within X hours, or within X days.
Simply enter a zero (0) into the text field before you enable automatic invites on the dashboard tab. This will tell the WOTIO app that you want the invite to go out ASAP for your customers. Depending upon system load, the invites generally begin deploying within a few minutes.
The site link feature of our app is commonly installed on our merchant’s login page for their customers to see prior to trying to log in to a newly migrated store. Your customers will need to activate their accounts before they can login.
Here is the step-by-step process to installing this link on your store’s login page.
1. Visit the Site Link tab in the WOTIO app.

2. Edit the text you want to display along with your activation link. Make sure you put text in each field.

3. Click the ‘Save Settings’ button at the bottom of the page.

4. Copy the custom code block for your site link.

5. Navigate to the Online Store > Themes section of the Shopify admin.

6. Using the ‘Actions’ menu, select ‘Edit Code’.

7. Find your ‘customers/login.liquid’ file under the Templates section, and click it to edit it.

8. Locate the place in your code that is appropriate to display your site link, and paste your code block. Every site is different, and this might take some trial and error finding the right placement if you aren’t comfortable editing code. Pasting it right above the login form usually works well.

9. Visit your login page to check the placement of your site link, and make adjustments if needed for fonts and spacing by using custom CSS in the WOTIO app. Visit the site link tab and scroll down to the custom CSS section to make any updates.

That’s it! If you need assistance with this process, please reach out to support through the WOTIO website, and we’d be glad to help.
Yes, after an invite is sent to your customer with the WOTIO app, the customer’s account status changes to ‘invited’.
Yes, you can create translations for each language your site supports for use with our site link. You can select and individually edit the translation for each language. Additionally, you can create custom HTML emails for each language using our built in HTML email editor.
If your customers have multiple records in your Shopify database, they might receive invites for records that have not yet been activated. You should run a search on your Shopify admin for that customer’s email address to see if they have multiple records for that email address.
Here’s an article that speaks to some ways you can also merge customer accounts in your store.
Yes. If you tag your old customers with a customer tag, you can block those old customers from receiving invites using our tag blocking feature. That will leave only your new customers receiving emails.
We have a version of our code that does not load jQuery, so that you can use the jQuery included with your Shopify theme.
Just replace this ‘src’ for the javascript in the site link code block:
https://wotio.app/customeractivate_ml.js
With this:
https://wotio.app/custom/customeractivate_ml_nojquery.js
The bulk invites feature of the WOTIO app allows you to send invites to all of your customers that are eligible to receive an account invite. ‘Eligible’ customers are customers that do not have an account with your Shopify store, and have not been previously invited.
To send out bulk invites, you need to have a bulk invite credit in your account.
- Purchase a Bulk Invite Credit – With all WOTIO plans, merchants can purchase a bulk invite credit that can be used to send out a bulk invite. Once a credit is purchased, the bulk invite tool becomes available for use.
- To purchase a bulk invite credit, look for this button on the bulk invites tab:

If the customer does not have a record of a purchase in your store, then clicking the ‘activate account’ option on the site link will not do anything. If you would like to give the customer the option to create an account, then you would simply put an additional ‘create a new account’ link below the site link in your HTML, to give the customer that option.
If you are using the WOTIO Advanced plan, then any update to a customer’s record in Shopify will possibly trigger an invite to be sent to that customer, provided they don’t already have an account with your store.
If you are doing a bulk update of customer information (such as bulk tagging customers), and you don’t want them to receive an invite during this process, you will want to disable automatic invites until 30 minutes after you have completed that update of customer information.
